The Tape Measure Trick Most People Don’t Know About
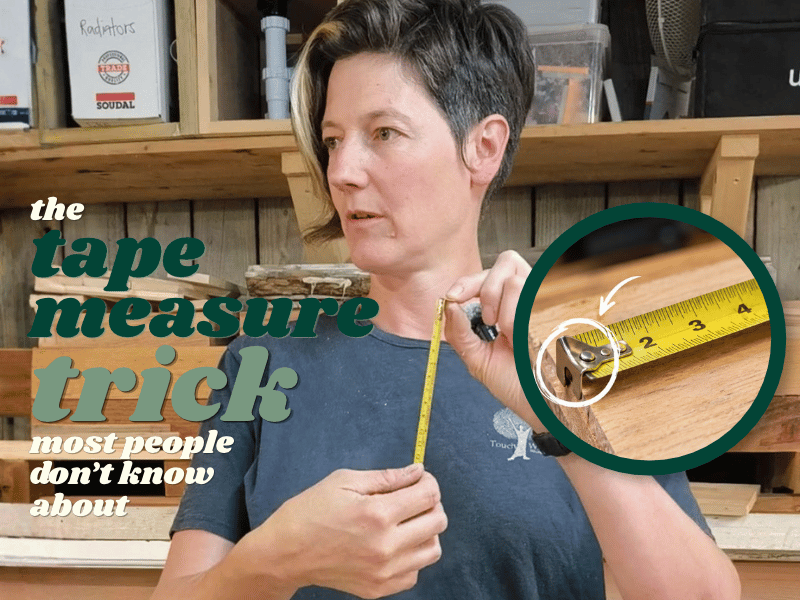
Have you ever pulled out a tape measure, noticed the little metal hook on the end wobbling back and forth, and wondered if you’d bought a dud? You’re not alone. It’s one of the most common questions we get asked in the workshop, and plenty of people quietly assume their tape is broken or just a bit cheap.
The good news: that wobble is completely deliberate. The end of a tape measure is designed to move, and once you understand why, you’ll measure more accurately. You’ll also spot the one situation where that clever little hook can catch you out.
Is my tape measure broken if the end is loose?
Almost certainly not. The metal hook at the end of your tape (sometimes called the end hook or tang) is riveted on with a small amount of play. That movement is roughly the same as the thickness of the hook itself, and it’s there on purpose.
If the hook is bent, clogged with sawdust or so loose it flops around well beyond that small slide, that’s a different story, and it’s worth checking your tape against another one you trust.
Why the end of a tape measure moves
Every measurement on your tape is taken from a zero point. The problem is that the hook is a piece of metal with its own thickness, and depending on how you use the tape, that thickness either needs to be counted or ignored. The sliding hook sorts this out for you automatically.
When you hook it over the end of something (an outside measurement)
When you catch the hook over the end of a board and pull the tape out, the hook slides outwards. That means your zero point is the inside face of the hook, right where it touches the timber, so you get an accurate reading from the very edge.
When you push it against something (an inside measurement)
Say you’re measuring the inside of a cupboard or the gap between two walls. You push the end of the tape against the surface, and the hook slides inwards by its own thickness. The metal effectively disappears behind your zero point, so the thickness of the hook isn’t added to your measurement.
Either way, you still get an accurate measurement. Clever, right?
Where the moving hook catches you out: measuring from a line
This is the situation that trips up lots of beginners.
Want to see it in action? Watch our quick video below, where our tutor shows exactly how the hook moves and why it can’t give you an accurate reading from a pencil line.
Timber doesn’t always arrive with nice square ends. If you hold a combination square (a “combi square”) against the end of a board, you can quickly see whether the end is truly square, meaning at 90 degrees to the edge. If it isn’t, measuring from that wonky end will throw everything off. (A combination square is on our basic toolkit list, along with a good tape measure.)
So the sensible thing is to:
- Check the end with your combination square.
- If it’s not square, mark a fresh square line across the board a little way in from the end.
- Use that line as your starting point: it’s where you’ll cut off the uneven end, and where your next measurement is taken from.
And this is where the tape measure gets awkward. If you try to hold the end of the tape on that pencil line and “hope for the best”, you won’t get an accurate result, because the hook moves. It isn’t hooked over anything and it isn’t pushed against anything, so there’s nothing to tell it where zero should be. A millimetre or so here and there soon adds up.
As our tutor puts it in the video: when we’re measuring from a line, it’s no good. We’ve got to do something else.
How to measure accurately from a line
A method many woodworkers use is to take the hook out of the equation altogether and start from a clear, round number on the tape instead. We’d suggest the 100 mm mark (or 10 cm).
- Line the 100 mm mark up exactly with your pencil line.
- Hold it firmly in place with your thumb so it can’t creep.
- Read the measurement at the other end.
- Subtract 100 mm from that reading to get your true measurement.
- Mark it clearly with a sharp pencil, then check it once more before you cut.
So if you need a piece 450 mm long, you’d mark at 550 mm on the tape.
Why 100 mm rather than 10 mm? Because it’s a round number that’s easy to subtract, and it’s big enough that you’re unlikely to forget to take it off. A Fine Woodworking guide to tape measures makes the same point: the author started from a smaller mark, forgot to add it back a couple of times, and switched to a bigger number because the adjustment is “too big to forget”.
Common tape measure mistakes to avoid
- Forgetting to subtract. If you start from the 100 mm mark, say it out loud or jot it on your offcut. It’s the easiest mistake to make and the most annoying one to discover after cutting.
- Measuring from an uneven end. Always check the end of your timber with a square first.
- Holding the hook on a line. As above, the hook moves, so it can’t give you a reliable zero from a pencil mark.
- Reading the tape at an angle. Look straight down at the mark rather than from the side, and keep the tape flat against the timber where you can.
- Letting the tape snap back. Letting the blade whip back into the case can knock or bend the hook over time, which affects every measurement you take with it.
- Swapping tapes mid-project. Two tapes can read very slightly differently. Sticking with one tape for a project keeps everything consistent.
A few safety points
- Guide the tape back in. The edges of a tape measure blade can be sharp, and a fast-retracting tape can nick fingers. Let it slide back slowly.
- Mark before you cut, and check twice. Accurate marking is a safety habit as well as a quality one: fewer re-cuts means less time at the saw.
- Secure your timber when cutting off the uneven end. Clamp the board firmly and use the right protective equipment for the saw you’re using.
Small details, big difference
Understanding why the end of your tape measure moves is one of those small “aha” moments that makes a real difference to your work. Use the sliding hook for what it’s designed for (hooking over an edge or pushing against a surface), and when you need to measure from a line, start from a round number and subtract it. It’s exactly the kind of accurate measuring you’ll rely on for jobs like putting up shelves and curtain rails, which we cover on our DIY Carpentry & Power Drills course.
If you’d like to build your confidence with measuring, marking and cutting in a friendly, supportive environment, take a look at our Carpentry Skills Courses for Women or start from home with Online Carpentry Basics. Got a tape measure question? Ask us on Instagram. We’d love to hear if you’d ever noticed the end of your tape moving!
Looking for more quick fixes? Watch our video on adjusting kitchen cabinet hinges.
FAQs
Why is the end of my tape measure loose?
The hook is designed to slide by roughly its own thickness. It moves out when you hook it over an edge and in when you push it against a surface, so both types of measurement are accurate.
How do I know if my tape measure hook is damaged?
If the hook is visibly bent, clogged with debris, or your tape doesn’t match a second tape you trust, it may be inaccurate. Some hooks can be cleaned or adjusted; otherwise, it’s time for a new tape.
How do I measure from a pencil line with a tape measure?
Don’t rely on the hook. Line up a round number, such as the 100 mm mark, with your line, take your reading, then subtract 100 mm.
Should I measure from the end of a board?
Only if the end is square. Check it with a combination square first. If it isn’t, mark a new square line and work from that.
What is a combination square used for?
It’s a marking and checking tool used to draw lines at 90 degrees (and 45 degrees) across timber and to check whether edges and ends are square.